
 Translate
Sitecore basics
If you need to print this out, or if you really, really enjoy scrolling, here's the whole thing at once.
Necessary Web browser settings
Sitecore's recommended browser is Google Chrome, although it works in all the major desktop browsers.
Logging in
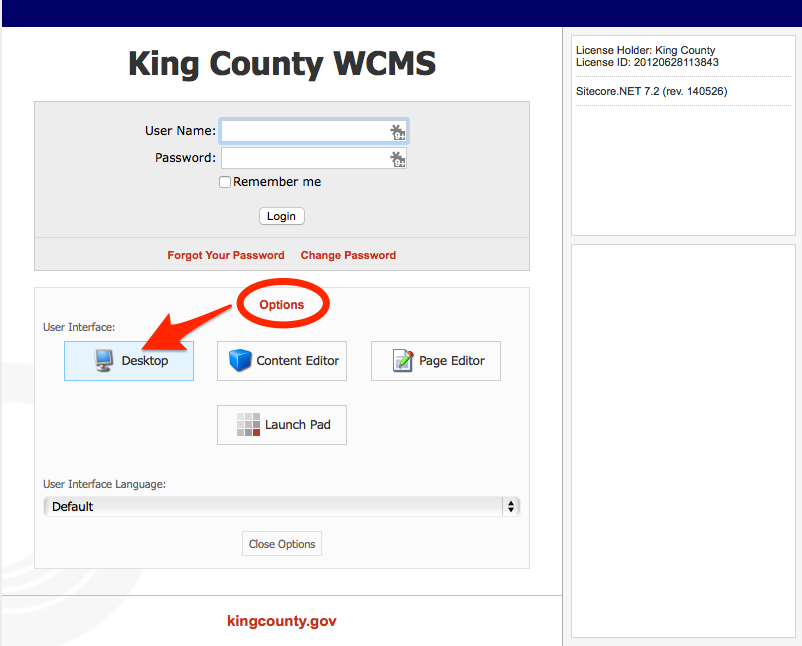
Sitecore offers multiple options at login.
- Try the Page Editor for quick changes to text.
- Log into the Content Editor for making more complex changes to text, and to work in the Media Library.
- Use the Desktop for access not only to the editing tools and Media Library, but to the Control Panel, Recycle Bin, search tools, and the rest of the Sitecore experience.
Hint: Most people just log in to the Desktop by default. That makes everything available.
We generally set up your individual Sitecore account after you complete these course materials. For this class, please use the training account login and password provided below.
Try it now: Logging in
Go to edit.kingcounty.gov/sitecore
Choose the "Desktop" option as shown above and log onto the site now with a training account.
Login:
01
Password:
student!
(Login may be 01, 02,... 09, 10,...16)
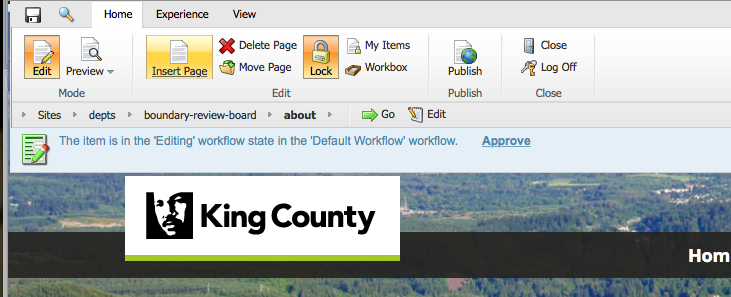
When you log onto the desktop, there's one main button down in the lower left.
The Sitecore button changes color when you move the mouse over it. When you click it, a menu of available choices pops up.
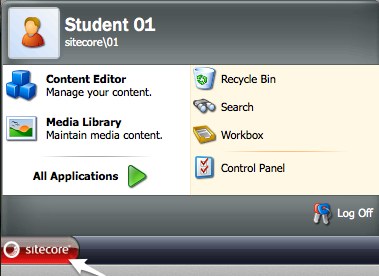
The Control Panel is where you'll need to go every 90 days to update your password. (Sitecore doesn't require that; it's a King County IT policy.)
If you delete a piece of content, you can find it in the Recycle Bin. Browse back to the date you deleted the item, and click restore.
The Media Library is where Sitecore stores files like pictures and PDF documents.
You'll be spending the majority of your time in Sitecore working in the Content Editor, so let's open that now.
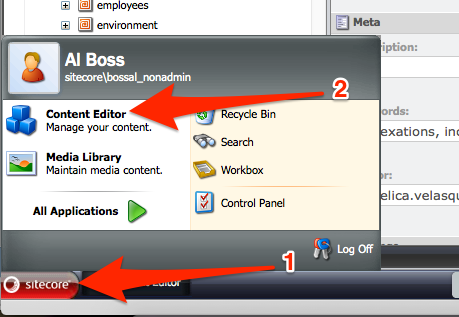
Try it now: open the Content Editor
Click the Sitecore button in the lower left corner of the screen, and choose Content editor.
The Sitecore Content Editor
There is a fairly complex set of toolbar "ribbons" across the top of the Sitecore window. All the controls to create or edit a page are in the Home ribbon.

The Content Editor opens at the root level of kingcounty.gov, and promptly reminds you that you don't have permission to edit the County's home page.
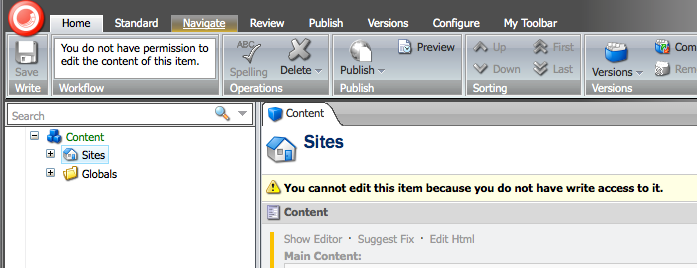
Click the tiny + boxes in the content tree until you find your content. Notice the alert that you must lock an item before you can work on it. Use the Lock and edit link (immediately below) or the Edit button (further down the page). Both these options do the same thing.
For this training, we will be using a special training directory. Details follow.
Try it now: navigate in the Content Editor
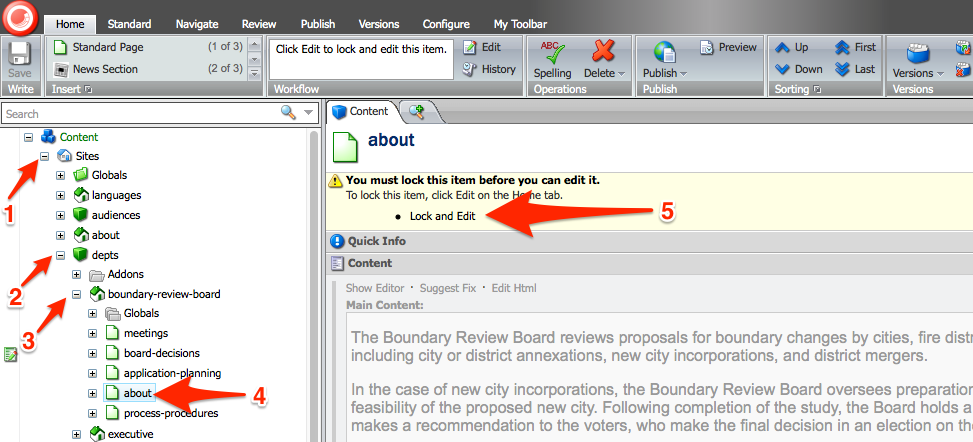
In the Sitecore content tree, click the tiny + boxes in the content tree to navigate your way to /sitecore/content/training/.
Click the mouse on training so it's highlighted.
Notice that selecting training didn't expand it. Click the tiny + box next to training, and now click on online-class to select it.
Notice that clicking your way down to online-class, and even on the + box next to it, does not select it. You have to actually click on the online-class item itself to tell Sitecore that's what you want to work on.
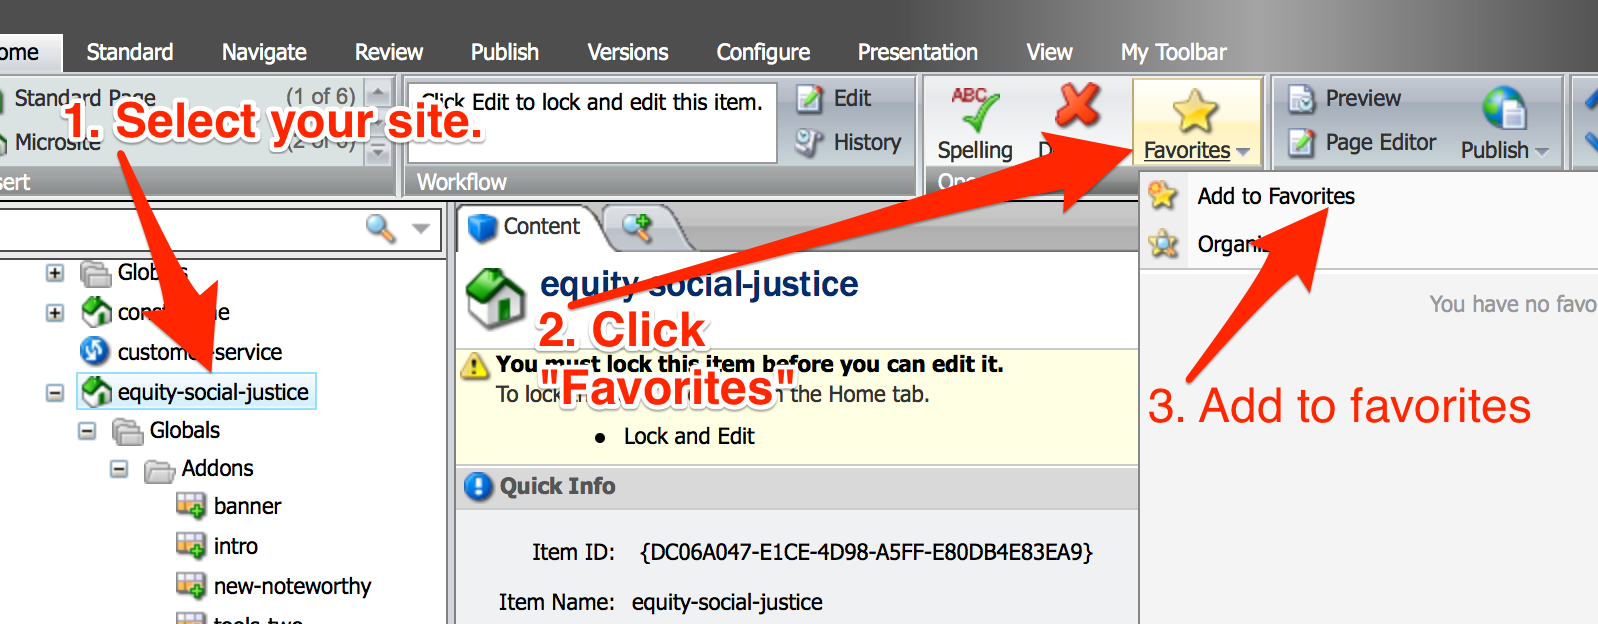
Hint: when you have completed this training and are working with your own Sitecore login and your own content, you can use the Favorites button in the ribbon to create a shortcut directly to your content.
Try it now: click some items under the current site
You're in the online-class Website. Click some of the items below online-class and notice how the alert messages change.
You'll encounter messages that say either, You cannot edit this item because (some other user account) has locked it, or You must lock this item before you can edit it.
When you create a new Web page, or open one for editing, Sitecore automatically checks the page out to you, creating a new version of the page and locking the page so others can't overwrite your work. Nobody else will be able to edit the page until you check it back in.
A limited number of past versions of a Sitecore item are visible behind the Version button on the Sitecore toolbar.
Try it now: Check out, check in
Find a page that's available for editing, and check it out by clicking Edit (circled immediately below) or Lock and edit (shown further up this page).

Make a small change in the "Title" box.
Click Save (top left corner of the toolbar), and Check in. (The Check in button replaced the Edit button when you locked the page for editing.)

Important: Whenever you're done editing any page, check it back in. That way, others will be able to edit it without having to ask you to check it in.
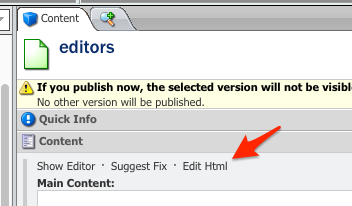
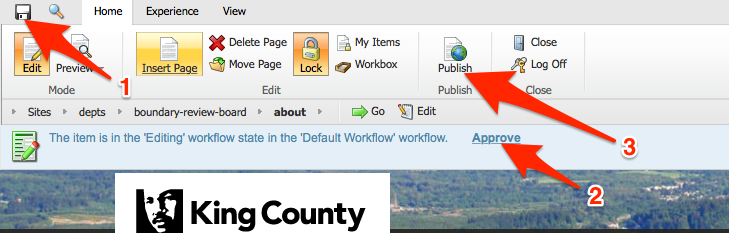
When you check an item in, you will usually see a warning that says, "If you publish now, the selected version will not be visible on the Web site because it is not in the final workflow step." That message means “If you can see the ‘Approve’ button, approve this item before you publish it."
Publishing will publish the last approved version of a page. If you see Approve, that means the most recent saved version has not been approved for publishing.
Click Approve when you’re ready to okay the changes to go onto the Web. If there's no visible Approve, it's already been approved.
Approving an item does not publish it. Only the Publish button can put your approved content onto the Website. Publishing will be covered later in this training.
Try it now: let Sitecore help you keep track of checked-out and approved items
Right-click on the far left side of the content tree. From the pop-up menu, choose at least My locked items and Workflow state. Icons will show you when you have items either checked out or waiting for approval. For advanced use, Publishing warnings can be helpful if you have content you've set to be unpublishable.
![]()
![]()
I want to edit some content!
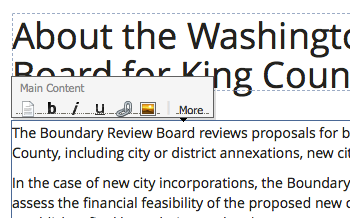
Sitecore offers three different editors. ( ! ) Most people work within either the basic content editor or the in-page editor. Power HTML users often prefer the HTML editor, which is the quickest way to work directly with code.
The in-page editor is the simplest way to make edits directly on the page that users will see on the Internet. It works differently from the other editors, and is reviewed later in this course.
The "Show editor" button leads to a more advanced editor.
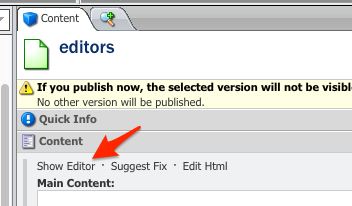
This editor has quite a few options available on its toolbar, to help you do things like format text or add an image to a page, without having to work in HTML code.

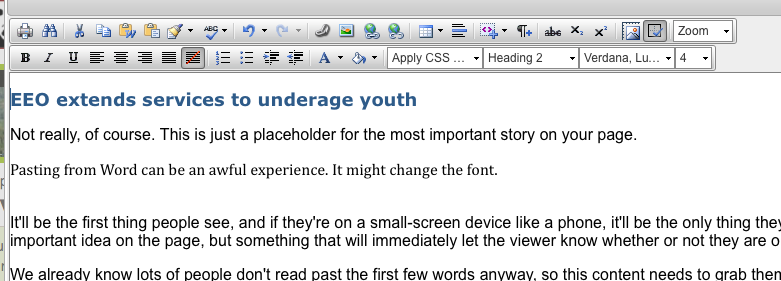
Sometimes you have to work in the HTML code
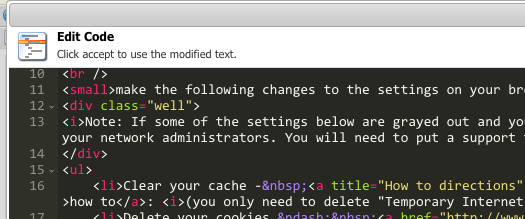
If you need to get into HTML code (for example, to paste in a code snippet from our help pages), click the HTML tab in the bottom left corner of the editor.
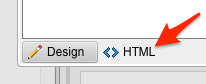
Here's what that looks like:
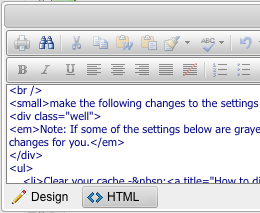
Some people just want to work in HTML code and nothing else
Power HTML coders might prefer an editor that behaves more like a traditional code editor. You can most quickly get to an HTML code editor by clicking the "Edit HTML" button on the content page.
(Note that this editor is not the same thing you get by clicking the "HTML" tab pictured above.)
Since power coders like their keyboard shortcuts, here's a list of keyboard shortcuts for the HTML editor.
Making new pages and addons
To create new content, you right-click the mouse over the parent item. In the example below, the page named "alex-page" would be the parent Web page of a new Standard Page. To create the new item, right-click the parent node and select New when the menu pops up. In the 'New' menu, select the type of the new item to be created.

Insert options depend on the parent item, but can include:
- Standard page
-
A Web page that may or may not have sub-pages
- Category
-
A collapsible folder in the left-hand menu. Pages under a category will show up when you click the + on the menu.
- Microsite
-
A site or independent section of a site. It can have its own navigation and design, or it can inherit from the parent site.
- Redirect link
-
Also known as a shortcut, alias, friendly URL. We use these to make it easier for people to get around in our site.
- Shared item
-
(In the Shared Item folder): re-usable content that you intend to show on more than one page in your site.
- Column row
-
(In the Add-on folder): Used for content that goes all the way across the screen
- Double column row
-
(In the Add-on folder) Spits the computer or tablet screen into two columns. These can be of equal size, or one column can be twice the width of the other. On a phone, the content appears as a single long column.
- Three column row
-
(In the Add-on folder) Splits the computer and tablet screen into three columns of equal width. On a phone, the content appears as a single long column.
- Color boxes three row
-
(In the Add-on folder) Three clickable boxes, filled with the primary color of the site's theme. These are often used to highlight an agency's three highest-profile services. On a phone, the boxes appears in a single column.
- News dated list row
-
(In the Add-on folder) An automatically-generated, dated list of sub-items, listed in reverse chronological order.
Fill in the file name you want. (Take great care not to include spaces, periods or commas or other punctuation*, slashes, or symbols like dollar signs or ampersands, in the file name. *Hyphens are okay.) Press Enter.
Spaces are not allowed in file names on the Web. This name will become part of the Web address (URL) for the page. The name should be all in lower-case. Use complete words, not abbreviations or acronyms. Use dashes to break up words: quarterly-report. Search engines work best with hyphens between words. If it’s a document, try to use words that a layman would use or might search for: early-retirement or insurance-waiver, for example.
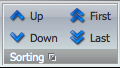
You can place this new page wherever you want it in the content tree (where it will appear in the left-hand navigation) by using the Sorting arrows in the Home tab at the top of the Sitecore screen.
Once you've created the page, you can begin filling in its various text and rich-text fields---the latter being those that are not unlike editing in Word. (You can even paste text into rich-text fields from Word, but magic comes with a price. Later on in this training we will cover how to resolve the issues caused by pasting content from Word.)
Use add-ons, not tables, for layout. Tables were invented to hold data, but they used to be our best-known tool for layout, borders, and formatting. We now have better tools for that. It's best to restrict use of tables for holding actual tabular data.
Refer to our style guide for ways to add color, borders, and other formatting elements.
If you have tabular information or other data (charts, graphs, maps, calendars etc.) on your Website, consider putting your data into our open data tool (Socrata) and using our tools to display that information on your Web page. It is much easier for you to update data on the data site and let the Web page automatically refresh than it is to type information into an HTML table or manually create data visualizations.
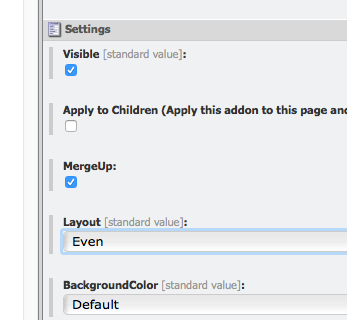
Most content in pages will be stored in add-ons. These are independent sections of a page. Each add-on can have one, two, or three columns on a computer. Unlike an old-school HTML table, an add-on with multiple columns is responsive: add-ons display differently on cell phones and tablets, re-organizing themselves to take the best advantage of the screen they're on.
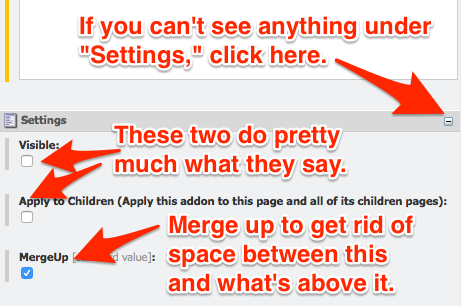
Each add-on has a visibility toggle, so you can set up content in advance and then toggle it on or off as you need it.
Each add-on has an apply to children toggle. That will insert the contents of the add-on below the content of every page that is a sub-page of the one that has this add-on.
Each add-on also has a merge up toggle. If merge up is toggled off, then there's extra space between the add-on and whatever is above it, and the background color of the page shows through.

Try it now: make a new page with Add-ons
If you haven't already done so
- open the Content Editor by selecting Sitecore menu >> Content Editor.
- click the tiny + boxes in the content tree until you find what your content needs to be added under.
- navigate your way to /sitecore/content/training/online-class/.
Right-click on the Website directory called your-site and, from the pop-up menu, left-click Duplicate.
That creates a new Website. Name it with your own name (hyphens, no spaces).
Now right-click on your name and left-click Insert. Click to create a new Standard Page.
Give it a name. Do not (ever) use spaces when naming a new page. Use hyphens between words instead. This name will become part of the Web address (URL) for the page.
Hint: Search engines work best with file names that have hyphens between words.
Use the sorting tool to move your new page near the top of the Website you just created.
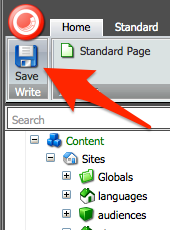
In the Sitecore toolbar, top left side, click the Save icon (a floppy disc).
Look through the standard fields
The Title field will populate the page heading, the left-hand navigation menu and the breadcrumb navigation across the top of the page, and the HTML <title> tag that shows up in the browser bar.
The Meta section contains fields for description, keywords, and author. Some search engines use this information. You might need to click the tiny + to expand the Meta section so you can see its contents.
The Settings section contains fields a menu title (if you want a shorter one than the page title), theme colors, the hero image (the large photo across the top of every page), hide menu (don't show the menu on this page), hide from menu (don't show this page on the left-hand navigation menu), and a title tag. You can use the title tag field here to put different content inside the HTML <title> tag that shows up in the browser bar. The contents of the this title tag field are arguably among the things search engines pay the most attention to. If your page title isn't as descriptive as you'd like, you can augment it here. You might need to click the tiny + to expand the Settings section so you can see its contents.
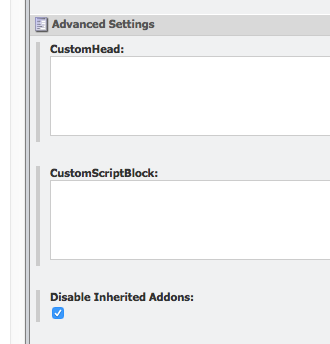
The Advanced Settings section contains fields for:
- Custom head
-
Content to insert inside the HTML <head> container on a page, such as a custom CSS <style> container
- Custom script block
-
Javascript
- Disable inherited add-ons
-
If a site has an add-on that's set to inherit (repeat throughout all its pages), this toggle will keep it from showing up on this page
- Temporary redirect
-
Automatically take the user to another page
- Apply customizations to children
- Add the contents of the custom head and custom script fields to all the pages below this one
You might need to click the tiny + to expand the Advanced Settings section so you can see its contents.
Create some add-ons
- click the tiny + box next to the page you just created
- right-click the Addons folder, and left-click Insert. Click to create a new Double Column Row. Name it intro-text (hyphen, no spaces).

- Follow the same procedure to insert a Triple-Column Row. Name it more-info.
- Now insert a Color Boxes Three Row. Name it buttons.
- Use the sort tools to put them in this order:
- intro-text
- buttons
- more-info
Use the Preview button to preview the page. (It will open in a new browser tab.)
Go back to the Sitecore content editor tab. Use the Sorting tool to move the buttons to the top. Go back to the preview tab and reload the page. See the difference?
Go back to the Sitecore content editor tab. Use the Sorting tool to move the buttons back to the middle, between the intro-text and the more-info add-ons.
Go back to the Preview tab and reload the page to make sure the buttons are back where they belong.
You can re-use the content in an add-on by setting it to appear throughout a site, or throughout a section of a site, by checking Apply to children.
Throughout a site
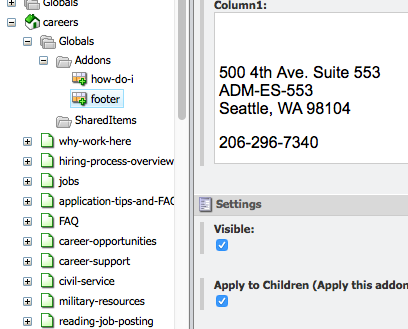
The content in an add-on in a site's Globals folder can be set to repeat at the bottom of every page in the site.
Throughout a section
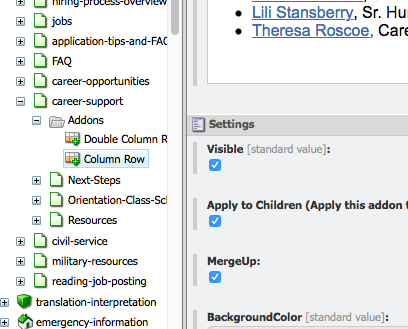
The content in any add-on can be set to repeat at the bottom of every one of its sub-pages. In this example, this add-on will appear on the career-support page and all its sub-pages.
To turn off an inherited add-on somewhere in a site, use the Disable inherited addons checkbox in the Advanced settings.
The contents of an inherited add-on will always appear below the regular content on a page. To re-use content on only a few pages, or to have greater control over where the re-used content appears, there's another Sitecore option available, the Shared item. This is covered in our advanced Sitecore training. There's documentation for it at kingcounty.gov/help/Sitecore/templates/shared-items.aspx (new window).
Lab: pasting from Word; add-ons; linking
Try it now: using the Sitecore text editor with Microsoft Word content
In Sitecore, on the page you've been working on, in the Addons folder, select the two-column intro-text add-on you just created. Find the big box labeled Column1 (it has placeholder text that says Column 1 content), near the top of the Sitecore screen). Click the words Show editor to launch the Sitecore editing window.
If you are working with your own content document, open it now. Otherwise, open this Word document and add its content to the main text window for the site you're working on.
-
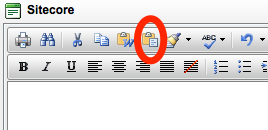
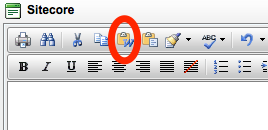 Copy the document and click the Paste from Word button in the top row of buttons of the Sitecore editor. Hold the mouse over it to make sure it's the right button.) Check out the results.
 -
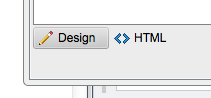
Click the HTML tab (bottom left) to see what the code is like.
-
Click back to the Design tab (bottom left).
-
Click Undo so the content you pasted in is no longer there.
-
 Click the Paste plain text button. (Hold the mouse over the button and the tool tip will tell you if it's the right button.) Check out the results.
 -
Undo.
-
Paste the content into place using the Paste from Word button that we used earlier.
-
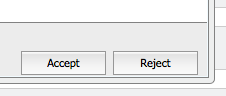
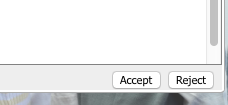
Now would be a really good time to save your work. In the bottom right of the window, click Accept.
This will return you to the main Sitecore window, and you should see the content you've been working on, visible in the Column1 field.
-
It's not saved. Not really. In the Sitecore toolbar, top left, click Save (the picture of the floppy disc)
Now you're safe. Let's fix that Word formatting now.
-
Re-open the text editing window for the intro-text add-on by finding the area labeled Column1, and clicking Show editor.
-
Clean up Word formatting
Pasting from Word can be an awful experience. This is because many people use Word like it's a typewriter, doing things like hitting Return twice to put space between paragraphs. On a Web page, that puts a really big space (because paragraphs automatically have space between them) so you’ll wind up having to delete or backspace to get rid of the extra spacing. If you can remove them from Word before you start pasting it’s easier. (Get your content people into the habit of changing Word’s defaults to put 12px space at the end of every paragraph.)
Word might also change the font face, which is an unwanted behavior for our Web pages since we are supposed to all be using the same font.
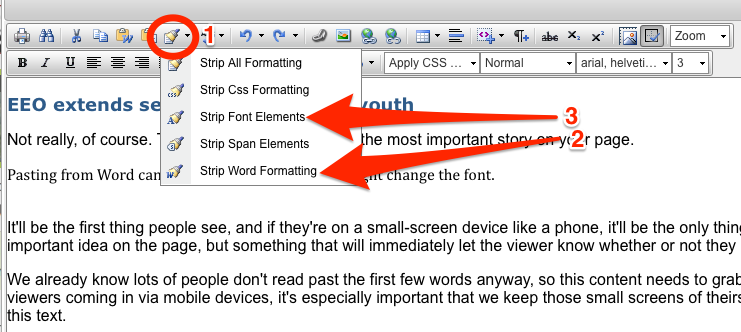
Among the Sitecore Editor's many tools are a format stripper, whose icon looks like a paintbrush. Click that, then choose Strip Word formatting, then choose Strip font elements. That should take care of things.
Use the backspace or delete key to get rid of extra space between paragraphs.
Click the HTML tab (bottom left) to see what the code is like.
If it still has a lot of code in it or if the page looks funny (odd colors), try the Strip CSS formatting tool in the format stripper.
-
Use the content editor to edit text
If you're working with the text we provided, change the hypotheses below the third paragraph into a bulleted list. If you're working with your own material, choose some text to turn into a bulleted list.
If you're not sure which button to use, watch the tool tips that appear as you mouse over the buttons on the toolbar. If what gets bulleted is more or less than what you had highlighted, put the cursor above content you want to change and click the New paragraph button. Now move the cursor below the text you want to set off from the rest and click the New paragraph button again.
You can also use the New paragraph
button to break a single bulleted or numbered item into multiple paragraphs without creating new bullets or numbers (which is the default if you just press the Return (Enter) key). -
Use the alignment buttons (2nd row of buttons left side) to right-align the name of the person who supplied the first quote. (Again, you might have to use the New paragraph button to properly separate this text from the surrounding text.)
-
Add hyperlinks
Linked text should ideally be an action that describes what's behind the link.
Good link text:
- Read the full report
- Pay your ticket online
- Claim your prize
Not-so-good link text:
- Click here
- this
- spam
Visually, linked words tend to stand out from the page, so we want these words to be among the most important things there. Search engines often give more emphasis to words that are hyperlinked, so descriptive links will help people find your content. Assistive software for visually-impaired people also emphasizes the linked text differently, and descriptive links make your pages much more accessible.
To add a clickable hyperlink that will lead to another page in Sitecore, within the Sitecore edtior use the button that has a picture of a chain link
 . If you're working on the course-provided content, in paragraph 2, link "significant problems" to a Sitecore page: the closures sub-section of the about/contact-us section of our Website. If you're working with your own content, select a couple words to link and proceed.
-
Use the mouse to highlight the words you want to link.
-
Click the
Insert Sitecore link button. -
Click the tiny little + next to the word about to reveal what's in that section. Expand the contact-us section.
-
Click on closures to highlight it.
-
Click Link to close this window and add the link to the highlighted text.
-
Also in the first paragraph, link 4Culture (in the provided text) or some of your own text to an outside URL, http://www.4culture.org.
-
Click the link above to open it in a new window, just to make sure you've got a working URL. Highlight the URL in the address bar, hold down the "Control" key and press the letter "C" on your keyboard. This copies the Web address, saving you from making a typo.
-
In the Sitecore editing window, use the mouse to highlight the words you want to link. (If you're not working with your own content, use the words 4Culture.)
-
In the top row of buttons, toward the left there's a picture of a globe with an intact chain link below it. Hold the mouse over it to see if the tool tip says Hyperlink manager.

-
Click the Hyperlink manager button after you've identified it.
-
Delete the http:// in the URL field that pops up, and paste in (Control-V on the keyboard) the URL you copied.
-
Click OK.
-
-
Save your work again. Accept in the bottom right to close the editing window, then the Save button in the Sitecore toolbar.
-
Click the Preview button in the Home tab to see how your page looks so far.
-
Close the preview window.
-
This item is checked out to you. Nobody else can edit it. If you were finished with this document, you'd click Approve to check it back in and make it publishable. Then, you'd click Publish to publish it. If you want anyone else to be able to work on the document but it's not ready to publish, click Check in but do not click Approve. This makes the edited item editable by others, but it cannot be published until someone clicks Approve. Approving it makes it able to be published, but it does not publish it. Only the Publish button can do that.
If you are linking to another page on kingcounty.gov, use Sitecore's link tool rather than just pasting in the full https://www.kingcounty.gov/ link.
Sitecore has very good link management capabilities if you use its link tool. It can prevent links from breaking when a page is moved, and will alert you about potential broken links if you delete content. If you create links by pasting in the full https://kingcounty.gov/ link, however, Sitecore sees that as an external link, and you lose all the link management benefits you could otherwise gain.
To remove a hyperlink, highlight the linked words and click on the toolbar button that has a little globe atop a broken chain link. (Top row of buttons, toward the middle.)
- Check in
- Releases your hold on the page so others can edit it. If you don't check in a page, it's locked and nobody else can touch it.
- Approve
- This item is now available for publishing
- Publish
- This pushes the content out to the Internet
If you were really paying attention, you'll notice that the example text you may have just linked didn't follow absolute best practice since neither hyperlink contained a verb. Nonetheless, both were sufficiently descriptive to be acceptable.
Populating the Media Library
Sitecore uses an area called the Media Library to store documents, images, and other files.
Hint: Resize your photos to about 767 pixels wide before you add them to Sitecore.
The responsive design we use in our content management system resizes and rearranges parts of a page, including images, to best display on the user's screen, whether it's a phone, a tablet, or a computer monitor. Images should be at least 767 pixels wide, since that's what it takes to look good in our design on everything from a smaller iPhone to most large monitors. We don't recommend going much larger than that, because oversized images load slowly and can run up a citizen's phone bill quickly.
Most digital cameras come with software to help you resize an image, and there are also several easy Web tools such as http://www.picresize.com/ that will resize a photo to your preferences.
Try it now: using the media library
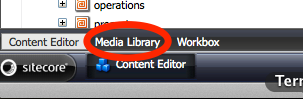
In the main Sitecore window, use the Media Library tab (bottom left).
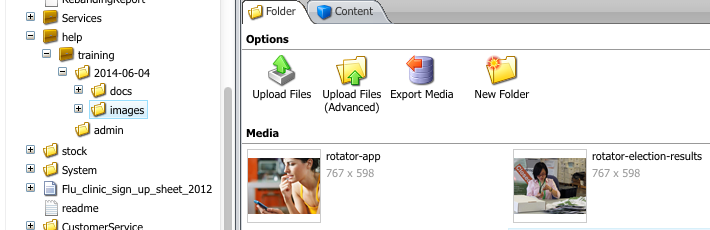
Create a media folder
Click the tiny little + next to /training, then click the + for /online-training, then click the + for the /images folder.
Right-click the mouse over the /images folder, choose Insert, then Media Folder, name it after yourself (NO SPACES), and click OK.
Go to the Edit tab at the top of the Sitecore screen, and click Check in. (Media library folders have to be checked in. The best time to do this is immediately after creating them, just so you don't forget.)
We need something on your hard drive to add to the Media Library. If you are working with your own images and documents, follow the instructions below to add one of each to the Media Library. If you're working with the provided course materials, right-click on the links to this photo and this PDF to save them to your computer, taking care to note where you've saved them.
Add an image.
In the content part of the screen, above where it shows you what's in the folder, there are buttons. Pick the one that says Upload Files (Advanced).
Find the image you just saved to your computer. Select it. There will be a bit of a delay and then you’ll see that the files are ready for uploading.
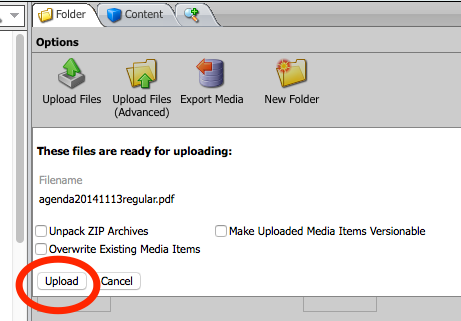
Click Upload, and after it's uploaded, click Close.
On the Sitecore screen, you can fill in some information about this picture. At the very least, fill in a value for the Alt field.
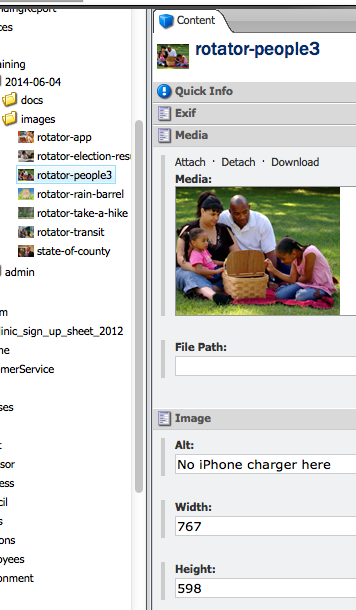
Roughly, the text in that field should convey the same message as the photo conveys, for those people who cannot see the image.
The image dimensions, image type, etc. are automatically recognized and filled in by Sitecore.
Save the image you just uploaded. As a rule, whenever you add something to the media library, go to the Publish tab and publish it right away. Otherwise you run the risk of linking to something you forgot to publish.
Add a document
Now, add a PDF. In the Sitecore media library navigation tree, move from the images folder to the documents folder (go up to /training/online-training, then to the documents folder therein). Create a new Media folder named after yourself (again).
Go to the Edit tab at the top of the Sitecore screen, and click Check in.
Return to the Media Library tab.
Use the Upload Files (Advanced) button, find the PDF you saved to your computer, and add it here.
Publishing from the Media Library
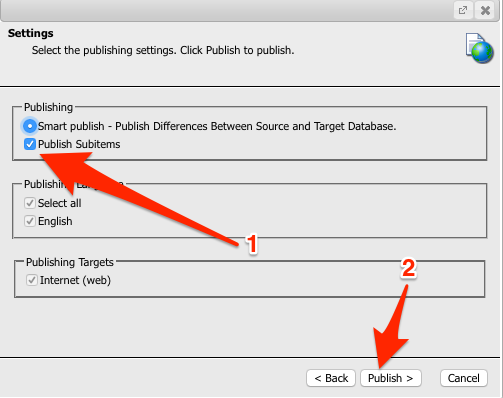
In real life, you'd highlight each folder you just created, go to the Publish tab, click the tiny arrow next to the Publish button, and publish the folder and all its sub-items (the images in it). If the folder hasn't ever been published, then efforts to publish its contents will fail.
Click the tiny arrow at the bottom right of the Publish button. Choose Publish item from the pop-up.

Make sure Publish subitems is checked. Click Publish.
Making sure a Media Library item has published
When you are working with your live site, one way to make sure a photo or PDF has published is to publish the page it's on and see if the image isn't there or if the download link is broken.
That, however, tends to be incredibly stressful. Whenever possible, it's best to publish media library items in advance and--in high-stakes situations like the Exec is about to refer to it on live TV--to check to verify ahead of time that the item is indeed published.
Here's how:
Click the item in the content tree, then click the red ball in the top left corner and choose Properties from the pop-up menu.
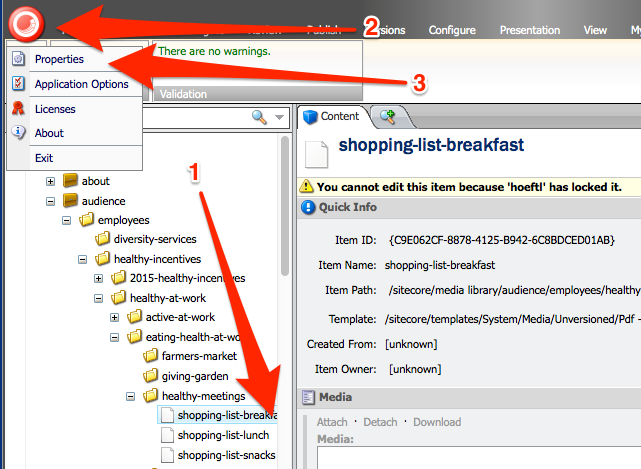
This will bring up a Properties window for any selected item in Sitecore. It can tell you what template an item uses, its workflow state, when it was created and published, who worked on it last, and other information.
From this Properties window, copy the Item URL.
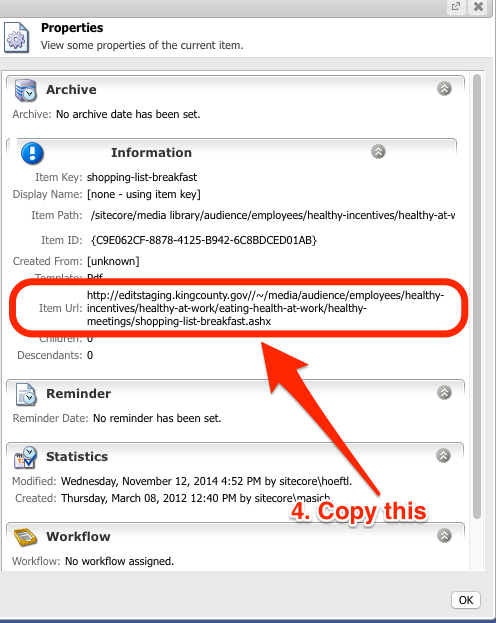
You can paste that into the address bar on a Web browser. Change http:// to https:// and delete edit from the URL so it starts with https://kingcounty.gov instead of https://edit.kingcounty.gov. After the .gov change the // to / and press Enter. If the file published, you should see it either open or download.
Using images from the media library
Try it now: insert an image from the media library
Return to the page of content you were working on previously. (If you've lost it, it's under content/training/online-training/.)
Open the text editor.
Put the cursor at the beginning of the second paragraph. Click the Insert Sitecore Media button in the editing toolbar.
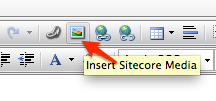
(It's between the two hyperlink buttons, top row left of center.)
Find the image you uploaded earlier, click on it, and click Insert to add it to your document. (If you forgot, the image is in the Media Library under /training/online-training/docs/.)
The image should appear in the editing window, wherever your cursor was. Now, let's make it look the way we want.
Try it now: edit the image properties
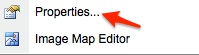
Click the right-hand mouse button over the image and choose Properties.
Put a 1-pixel border around the image. Change the Alt text to describe the image. For example, if you are using the training image provided earlier, change the Alt text to say Karaoke nights at local pubs have been infested with ukelele-playing chickens. (Copy and paste are your friends.) Click Image alignment and align the image to the right of the text. (It's the icon on the far right.)
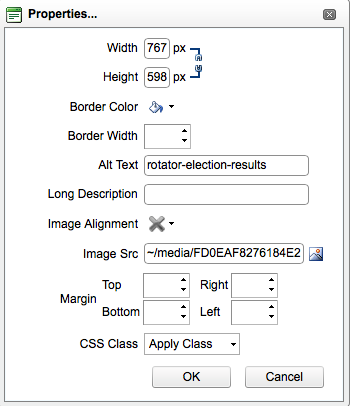 Click OK.
Hmmm, let's put some space betwee the sides of that image and the text. Right-click on the image again, pick Set image properties again, and in the Margin boxes, put 5 in the right box(es). Click OK.
That should add a 5-pixel space around your image on whatever side(s) you chose.
Now, delete the width and height so the image will resize according to whether it's being seen on a phone, tablet, or computer.
Click Accept (bottom right) to close this editing window.
Click Save so you don't lose your work.
You may notice that the image properties includes the dimensions. Delete these numbers. It's tempting to change the numbers in there to resize an image. Resist this temptation. Changing these numbers doesn't change the image; it tells the computer to load the image as it is and then display it differently. This will slow down your page load time, distort the image, and run up the costs on mobile users' data plan bills. It's always best to put the images into the media library with a width of 800px or under, and let our responsive design resize the image to fit where it is. There are free tools such as http://www.picresize.com/ that make it easy for you to change the size of a photo before you add it to the Sitecore media library.
Where is my media library item located?
Sometimes we to know the Web address for an item in the media library. You can find that from a different "Properties" dialog box.
In the navigation, select the item you want to check up on.
Click the circular red Sitecore logo on the top left corner of the screen. From the pop-up menu, choose Properties.
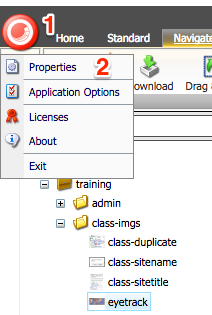
The URL for the item will appear in the properties box.
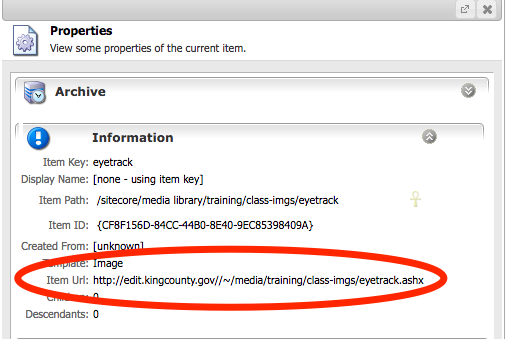
The Web address for this item begins with /. To check to see if something has published onto the Internet, copy the address and replace edit with www, i.e. https://www.kingcounty.gov/~/media/training/class-imgs/eyetrack.ashx
Working with add-ons and linking to media
The add-ons not only contain the content but also control the layout of the page
Try it now: add content to the right-hand column of a page
In the Sitecore tree, click the page you've been working on. Click Preview.
You have been working so far in the default two-column add-on, which gives you two columns of equal width. Right now, the first column has a lot of words and an image, and the second column just has a couple words of placeholder text (as do the two add-ons at the bottom of the page).
Click on the intro-text add-on. Scroll down to the Settings section, and under Layout, change from Even to Eight-Four. That will make the first column double the width of the second column.
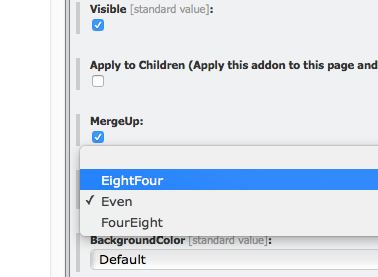
Click Save, and reload the page preview. The column containing the text should be much wider. The image may have grown, too, depending on the original.
Resize the Web browser window by grabbing the right-hand border of the window and dragging it left. You'll see the layout of the page change when you reach the width of a tablet (iPad, Android or Windows handheld computer). That's the responsive design at work. Drag the border all the way to the left and everything will change again to show you what your page would look like on a smartphone.
Return your browser window to its normal size.
Go back to the intro-text add-on in Sitecore.
Click Show editor for the second column.
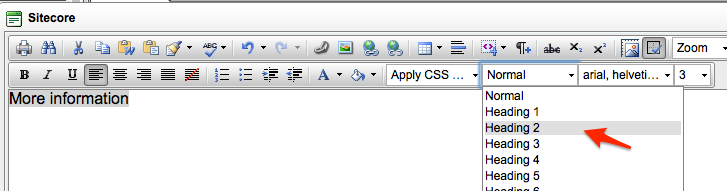
Delete the placeholder text. Type in More information. Press enter to start a new paragraph. If you're working with the provided copy, type in Read the original study. If you're working with your own documents, feel free to substitute your own link text here.(If you're copying and pasting the link words from above, be sure to paste as plain text so you don't carry in the formatting.)
Use the mouse to highlight More information, and on the right-center side of the lower toolbar in the editing window, change Normal to Heading 2.
We want people to click on Read the original study and go to the PDF you added to the media library.
Use the mouse to highlight Read the original study. Click the Insert Sitecore link button (the chain link). In the pop-up box, choose Media items.
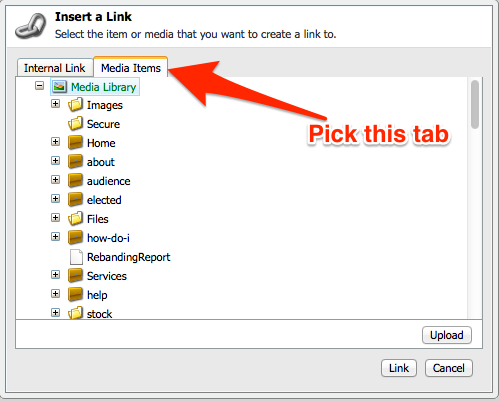
Find and choose the PDF you added earlier.
Add the link, accept the content, save the document, and preview it.
Work with the call-outs add-on
Click on the Color boxes three row add-on that you named buttons.
This add on has limited fields. Each call-out box can have title text, a link, and an icon. Use the link next to the Icon 1 label to see the list of available icon names to choose from.
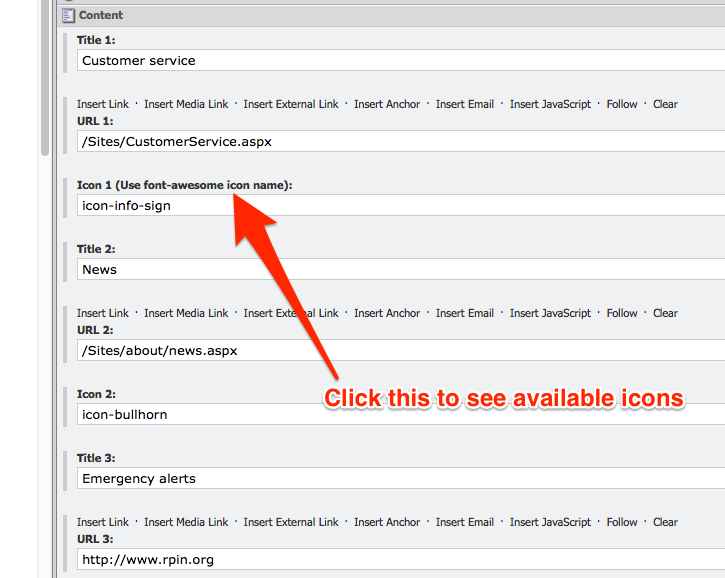
It's best to keep the titles short. These things look best with only a word or two in them.
Again, if you are linking to another page on kingcounty.gov, use Sitecore's link tool rather than just pasting in the full https://www.kingcounty.gov/ link.
Change the words, links and icons. Save your work. Refresh the preview to see how it turned out.
Work quickly: check in everything at once
It's easy to forget to check things in, especially with add-ons and categories hiding things you've checked out.
You can use the My items button on the Review tab to quickly see how many items in Sitecore are checked out to you. You can even use this tool to check in everything at once.
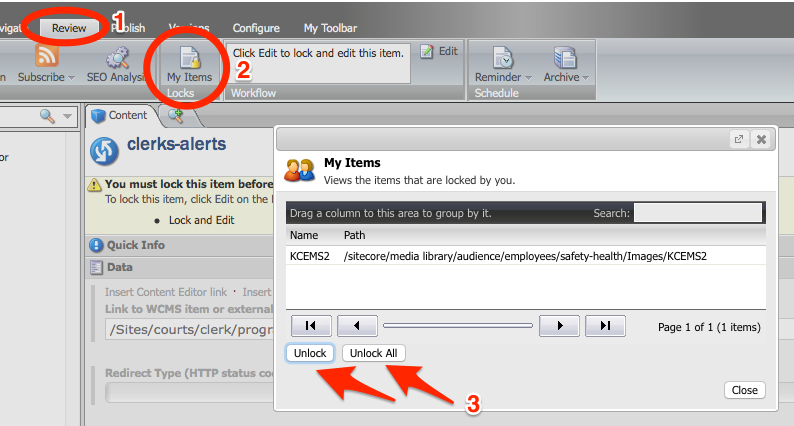
Don't start celebrating just yet! Unfortunately, there isn't a similar shortcut to let you approve everything after you check it in. You will have to do that item-by-item.
Remember: content that has not been marked Approved will not be published.
Work quickly: use the in-page editor
The in-page editor lets you do a lot of simple editing on a page in a what-you-see-is-what-you-get environment.
Click the Page editor button.
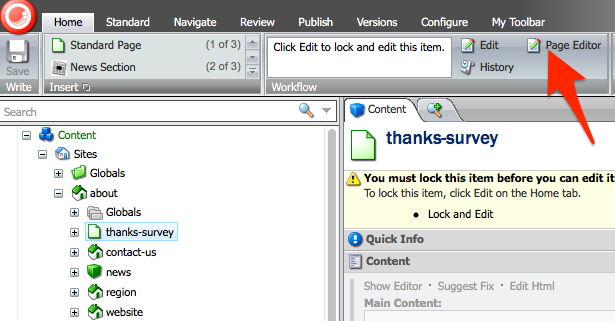
You should see a toolbar at the top of the page.
Hint: if you only see a thin menu bar across the top, click the downward-arrow in the far right corner.

Just click where you want to work, and start typing. A small toolbar will appear above your cursor.
Make whatever changes you need. Save often. (Top left icon of a floppy disk.)
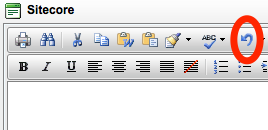
Hint: Use control-z to undo.
Hint: If you need more tools than bold, italic, link, or insert image, click the leftmost icon on the small toolbar in the page editor:
![]()
This will open an editing tool that has more advanced options for working with your content.
You'll need the advanced editor if pasting from Word changed the font. Among its many tools are a format stripper, whose icon looks like a paintbrush. Click that, then choose Strip Word formatting, then choose Strip font elements. That should take care of things.

When you're done working in the advanced editor, click Accept in the bottom right to close the editing window.
When you're done working in the in-page editor, click Approve, then when you're ready to publish, click Publish.
Hint: If your page contains an HTML form, the in-page editor will not work until you make a small change to the form tag.
If you created a form, or pasted in form code from Socrata, you will need to edit the HTML code. Use one of the content editor tools. (See The Sitecore Content Editor.) In the HTML code, change the <form> ... </form> container to <kc:form> ... </kc:form>
The final step: let us know you're done.
If you have completed everything, please open the Sitecore page you created. Copy the Web address from the browser's location bar, and paste it into an email to webteam@kingcounty.gov.
In that email, let us know what part of the King County Website you need to be able to edit.
One more thing: the Web representative is the person in your agency who gave you permission to become a Sitecore user. Please tell us that person's name so we can report back to them that you've completed this training.
Thanks for your time!