
 Translate
How to load and unload a bike
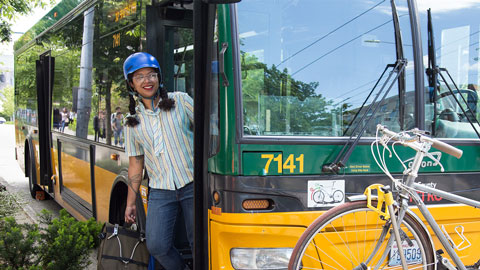
Every Metro standard bus can carry three bikes on its front rack. Bring your bike along to expand your range at no extra charge.

Things to know
- Every Metro standard bus can carry 3 bikes on its front rack.
- Some smaller community service vehicles carry 2 or 3 bikes.
- If the bus bike rack is full, please wait for the next bus.
- Bikes can be loaded on the rack at all hours of public operation and at all transit stops.
- There is no extra charge for your bike.
- Bikes are not allowed inside the bus, except for folded bikes.
How to load
Every Metro standard bus can carry 3 bikes on its front rack, while smaller community service vehicles carry 2 or 3 bikes. If the bike rack is full, please wait for the next bus. Bikes can be loaded on the rack at all transit stops.
-
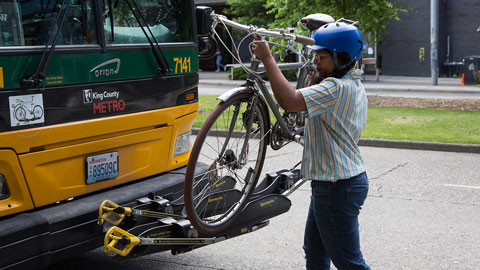
Get the driver's attention
Approach the bus from the curbside. Be sure the bus driver knows you're going to load your bike before you step in front of the bus. After the driver gives the ok, you can safely step in front of the bus.

-
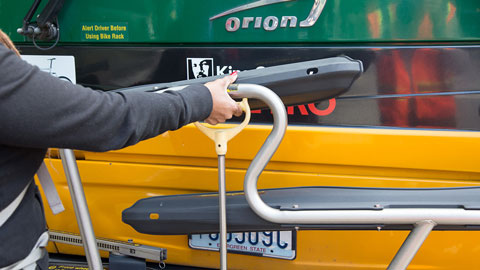
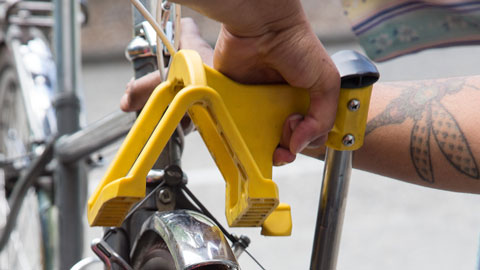
Lower the rack
Squeeze the rack handle upwards to release the folded bike rack. Lower the rack into the open position.
-
Place your bike in the rack
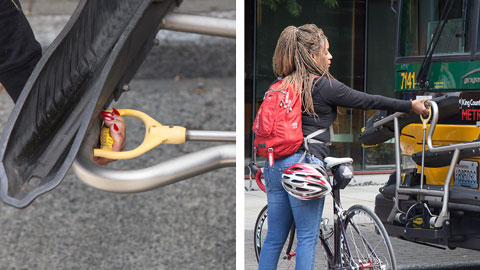
When the rack is empty, lift your bike into the rack space farthest from bus. Face the front wheel toward the hook (yellow or black). For tips on using the other rack spaces, read our FAQ.
-
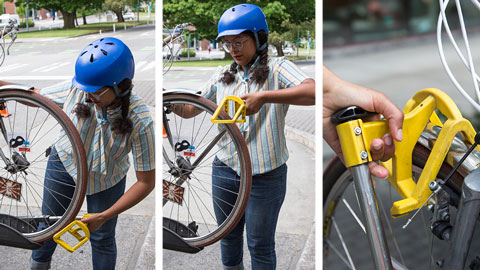
Secure the support arm
Squeeze the black button and pull the support arm straight out and over the top of the front wheel (if the rack does not have this button, just pull the arm out). Place the hook as close to the top of the wheel frame as possible. The hook can rest on top of fenders. Remove accessories such as bags.
How to unload
Please sit where you can keep an eye on your bike, then exit from the front door. Metro is not responsible for your property.
-
Get the driver's attention again
Use the front door to get off the bus and tell the bus driver you're going to unload your bike. Wait for the driver’s ok before stepping in front of the bus.
-
Release the support arm
Push in the black knob to lift the support arm off the tire (or fender). Move the support arm down and out of your way.
-
Remove your bike
Lift your bike out of the rack. If there isn’t another bike in the rack, return the bike rack to the folded position by squeezing the handle and lifting the rack toward the bus.
Types of bikes on buses
Only conventional, single-seat, 2-wheeled bikes are allowed. Both wheels must fit into bike rack wheel slots, and the support arm/hook must fit over the top of the bike wheel (fenders ok). Folding bikes are welcome inside the bus, provided they're folded and fit underneath the seat and can be kept out of the aisle.
Size and weight limits
| Max wheel size | 16" to 29" diameter |
|---|---|
| Max wheel base | 46" |
| Max tire width | 3" |
| Max weight | 55 lbs per bike, including accessories |
Other restrictions
- No tandem recumbent, cargo, 3-wheeled, or other non-traditional wheeled devices
- No gas-powered bikes
- No attachments over the front wheel that prevent the support arm from securely attaching to the bicycle
Accessories
Accessories and attachments are not acceptable if they have the potential to prevent other bikes from being loaded or damage another bike.
Accessories may not fly off, flap around, cause a visual distraction or other hazards. They should be no taller than the height of the handlebars, and cannot block the driver's vision or obstruct the headlights and turn signals. Examples of prohibited items include most types of child seats and baskets fashioned from milk cartons.
Bellevue College
Inside the bus shelter atrium in front of the main campus garage.
Highline College
Next to the bus shelter located on the south side of campus.
North Seattle College
On the College Way sidewalk by the flag plaza.
Kirkland Transit Center/Peter Kirk Park
Next to the pedestrian path leading into Peter Kirk Park.
Bike rack FAQ
The bus bike racks fit standard adult bikes. Read the size and weight limits for bikes.
No. The e-assist bike share bikes exceed the rack’s weight limit of 55 pounds per rack position. Please find another bike share bike at the end of your transit trip and save the rack spaces for personal bikes.
Park it in a bike locker or bike cage at a transit facility if you don't need to ride it at the other end of your transit trip.
The hook needs to be able to sit over the top of the wheel, close to the frame. If your basket or rack would prevent that secure position, you may not be able to use the rack. You don’t want your bike to fall off!
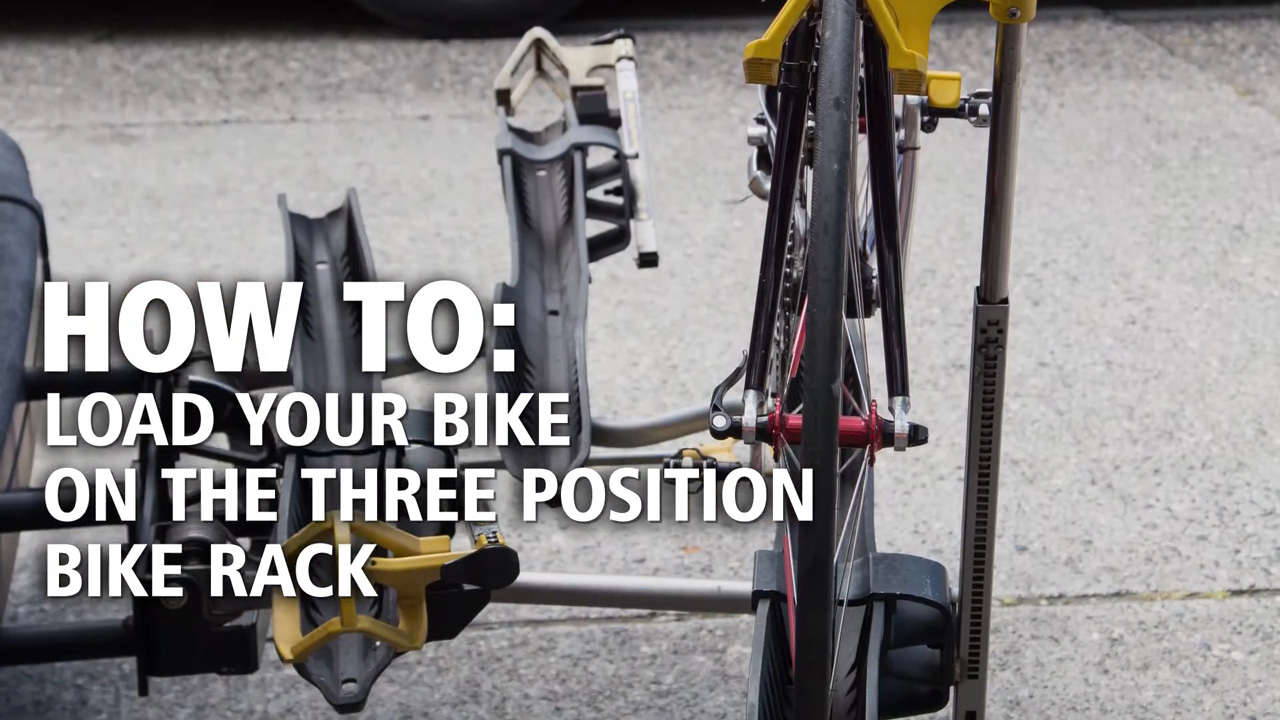
There are several models of racks, but all work in a similar way. Look for the label on an available slot showing which direction to face your front wheel—toward the curb or toward the street. Then set your bike in the slot. Pull the support arm straight out and up over the top of the wheel with the hook resting on your wheel or fender as close to the frame as possible.
Stand on the curb and face your front wheel toward the curb. Lift your bike and roll the back wheel into the track. Release the support arm and extend it over the front wheel, setting it at the top of the wheel next to the frame.
See how to use the middle slot of the bike rack
If the hook on the middle slot faces the street, stand in the street at the centerline of the bus. Do not stand in the line of moving traffic. Lift your bike at a 90 degree angle to the front of the bus with the back wheel toward the bus. Swing the back wheel past the first bike and set the back wheel in the slot without the hook. Set the front wheel near the hook. Pull out the hook and extend the support arm over the front wheel.
The slot farthest from the bus gives the driver the best view of the rack in use. The driver knows to leave extra space between the bus and a vehicle ahead of it. The outside space is also the easiest access for the bike rider.
If you don't need your bike at the end of your transit trip, consider parking it at your transit stop instead of traveling with it.
Thank you for your concern but don't worry! Remember that while you're loading your bike, other passengers are getting on the bus. Most of the time you'll just be getting on right after them. To test the racks before your first ride, check out ways to practice.
For additional questions, see the General FAQ and Bike Parking FAQ.